User Tools
Table of Contents
Getting started with the Projucer
The JUCE Projucer is a code and IDE-project generator. You specify what kind of project you want (e.g. GUI application, Audio Plug-In, etc.), and the target IDEs you intend to work with (e.g. Visual Studio, XCode), plus some other details such as a project name, and the Projucer will generate a complete project/solution for each IDE, including a few “starter” code files. You can then open each project/solution in the appropriate IDE, click on “Build” and within a few minutes have a working app or plugin for your target platform.
Well, that's the theory. In practice, there are lots of little details to understand, which can be overwhelming when you're just getting started. On this page I'll take you step-by-step through building a synthesizer plugin called VanillaJUCE for Windows (VST v2.4) and Macintosh (AU v2).
Creating your first project with the Projucer
The first thing you'll see, when you run the Projucer for the very first time (after you clear the hurdles), is the “Create New Project” page, shown below. On subsequent runs, you'll most commonly see the last .jucer project you had open, which the Projucer remembers. To create a new project, go to the Projucer's File menu and close whatever project is open, then choose “New Project…”
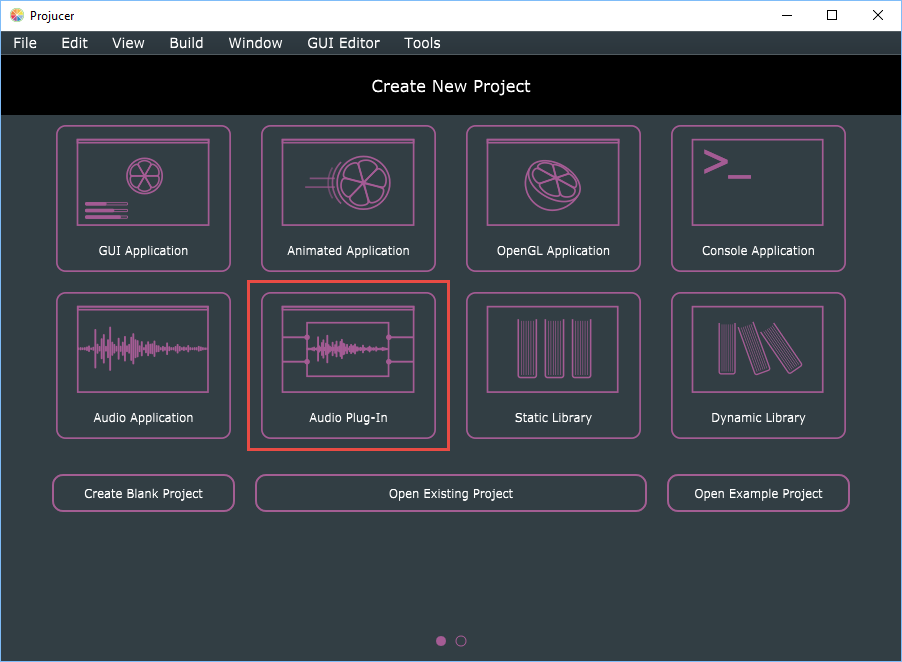
The Create New Project page has eight large graphic buttons for the eight most common project types. Click the button labeled “Audio Plug-In”, which I have outlined in red in the screen shot above. This will take you to the “second half” of the Create New Project page, as shown below. (Note the two pink circles at the bottom of the screen shot; these indicate that the page has two parts, and you can go back and forth between them by clicking on the circles. The filled circle indicates the currently-shown part.)

The first time you try the Projucer, when you haven't a clue what any of this means, it can be a little daunting, but it's actually straightforward.
The left half of this page is where you tell the Projucer where to put your new IDE project(s) and what to call it (them).
- Start by using the large folder-navigation box on the left (it works just like an Explorer/Finder window) to choose the folder in which you want your new project's folder to be created.
- The label “Project Folder” is a little confusing; I started by creating a new folder for my new project and selecting that, and ended up with a folder called “VanillaJuce” inside another folder called “VanillaJuce”.
- What you want to see in the combo box just under the label “Project Folder” is actually the path to your “projects folder”. The Projucer will create a new folder for your new project inside this one.
- After selecting your projects folder, go to the “Project Name” field at the top left, and type the name of your new project, in my case “VanillaJuce”.
- Whatever you type will automatically appear in the “Folder” field at the bottom left, i.e., the default name for your new project's folder is the same as the name you choose for your project. If you want a different folder name (but no change to the project name), you can type something different in the “Folder” field.
The right half of this page is where you select what kind(s) of IDE project(s) you require. Well, mostly. There's also that mysterious “Modules Folder” combo box near the top, and the “Use global module path” checkbox below it. These are related to what I said earlier about where you decided to put your main JUCE folder. I recommend that you DO check the “Use global module path” checkbox, and, if you chose to put the JUCE folder somewhere other than C:\ on Windows or your home directory on Mac/Linux, do the following right now:
- Click on the Projucer's File menu and choose “Global Search Paths…” to see this dialog:

- Fill in the correct path to the
JUCE\modulesfolder, wherever you decided to put it - Put something in for “User Modules” and “VST3 SDK” even if you aren't using these yet.
- Fill in the any of the lower four SDK paths only if you have actually installed them.
- If you will be generating IDE projects for a different computer (e.g., I ran the Projucer on my Windows PC and built both Visual Studio 2017 and XCode projects), use the drop-down menu at the top of the dialog to select your other platform(s) and fill in the appropriate paths for these also, unless you decided to install JUCE etc. in the default locations (which I recommend for Mac/Linux).
- Close the “Global Search Paths” dialog using the little “X” at the top of the window; there's no “OK” button.
Now that you have defined your “global paths”, the “Use global module path” checkbox should make sense, and you should understand why I suggested that you check it. So, back to the Projucer's Create New Project page:
- You can ignore the “Files to Auto-Generate” item at the top right; it isn't used for Audio Plugin projects.
- The “Target Platforms” list is straightforward. Check off whichever platforms you would like to build your plugin for.
- As I said earlier, I strongly recommend that you use Visual Studio 2017 on the Windows platform. The JUCE source code is being modernized at an aggressive pace, with the result that older versions are fast becoming incompatible due to use of newer parts of the C++ language standard.
- On the Mac, XCode is used to create plugins for Mac OS or iOS, but you need to specify which one(s) you want. If you check both, the Projucer will create two separate XCode projects (in separate folders) which point to the same group of source-code files.
- Note there is no option to select finer details at this time, e.g., whether or not you want to generate both plugin and stand-alone targets in your IDE projects. Don't worry; you'll be able to do this later.
- At this point, click the big pink “Create…” button at the bottom left, and the Projucer will immediately generate your first set of IDE projects.
A quick tour of the Projucer's output
The Projucer will create a new folder for your new project, containing three subfolders and a .jucer file:

The .jucer file is the Projucer project file, containing all the details you specified above. If you double-click this icon you'll re-open the project.
The Source folder contains the source code files that are unique to this project. For an Audio Plugin project, there will initially be four files as follows:
PluginProcessor.handPluginProcessor.cppdefine a new subclass of the JUCE AudioProcessor class, which represents your plugin itself.PluginEditor.handPluginEditor.cppdefine a new subclass of AudioProcessorEditor, which represents your plugin's GUI.
I'm not going to go into any detail about the content of these files. You can learn plenty by working through some of the JUCE tutorials. My goal here is to tell you what the tutorials don't mention, which you otherwise have to find out by trial and error.
The JuceLibraryCode folder's purpose is explained very nicely in a little ReadMe.txt file in it:
Important Note!!
================
The purpose of this folder is to contain files that are auto-generated by the Projucer,
and ALL files in this folder will be mercilessly DELETED and completely re-written whenever
the Projucer saves your project.
Therefore, it's a bad idea to make any manual changes to the files in here, or to
put any of your own files in here if you don't want to lose them. (Of course you may choose
to add the folder's contents to your version-control system so that you can re-merge your own
modifications after the Projucer has saved its changes).
So, these files are not the entirety of the “Juce Library Code”; the rest is in the JUCE Modules folder we went to such trouble about. These files are simply the few that have to be customized for your specific project.
The Builds folder is the most interesting one at this point. Here is what my VanillaJuce\Builds folder contained, after I selected Xcode (MacOSX), Xcode (iOS), and Visual Studio 2017 as my Target Platforms in the Projucer:

The Projucer created two separate folders for the two XCode targets (Mac and iOS), and one for Visual Studio. These folders can simply be copied as-is over to a Mac, and the XCode project files they contain opened and compiled—provided you set your Mac global search paths correctly, and installed put the JUCE modules folder and (optionally) VST3 SDK folder in the corresponding locations (see here for details. If not, you can always open the Projucer project again, modify the settings, and re-save to re-generate all IDE project files.
The contents of the VisualStudio2017 folder look like this:
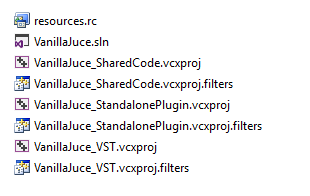
There is a single .rc file (binary resources), one .sln (solution) file, and three pairs of .vcproj/.vcproj.filters files for three individual Visual Studio projects:
- one to build the VST plugin (
VanillaJuce_VST) - one to build the stand-alone application (
VanillaJuce_StandalonePlugin) - one to build a
.libfile from all the code which is common to both plugin and standalone versions
Of these, the “shared code” file is by far the largest. It contains references to all of the code files in the Source and JuceLibraryCode folders, as well as a ton of files in the “JUCE modules” folder (which is why the Projucer needed to know where to find it). The others two projects just contain a couple of wrapper code files.
Reopening the project in the Projucer and re-generating the output
The Projucer's initial output is based on default settings for Audio Plugin projects. Once you have hit the “Create…” button, the Projucer window will change to something like this:
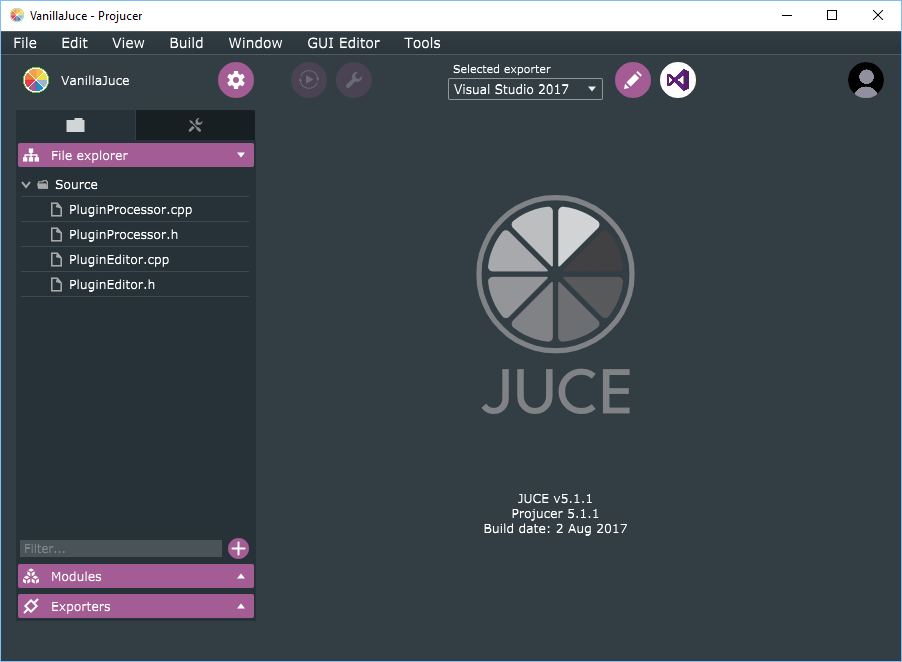
If you decided to close the Projucer, you can simply run it again to get to the same point. The Projucer will normally re-open to whatever project you had open the last time you closed it. If you happened to close the project, then close and re-open the Projucer, You'll see an almost empty window, and you can then get to the same point by going to the File menu to re-open your project's .jucer file.
You have several options when you have (re-)opened an already-created Projucer project like this. After making any changes, you can go to the File menu and choose “Save Project” to re-save the .jucer file and re-generate all the IDE project files.
- This is pretty much the whole point of using the Projucer at this stage.
- Bear in mind that all the IDE project files (everything in the
BuildsandJuceLibraryCodefolders) will be overwritten. I'll tell you how to handle that in a moment.
As mentioned above, if you got any of your global paths wrong, you can choose “Global Search Paths…” from the File menu and make appropriate changes.
You can change the project settings by clicking on the  button, which opens a view like this:
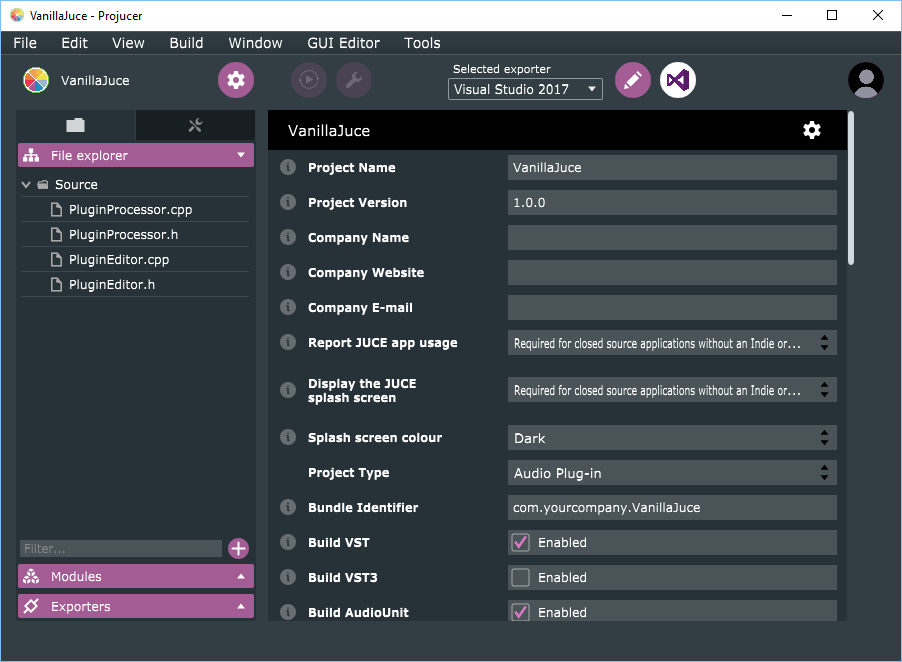
The large scrolling list of project settings has lots of items that you can ignore until you're ready to fill them in, e.g. Company Name and Website, but there are a few that you will need to set for a synthesizer plugin:
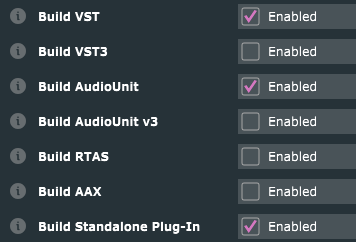
Choose the plugin formats you want to be generate.
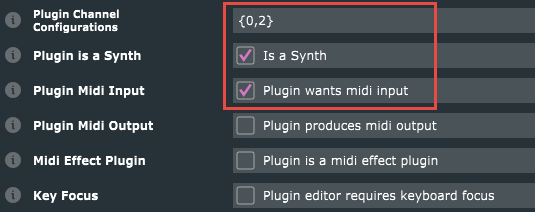
Plugin Channel Configurations are pairs of numbers {a,b} where a is the number of audio inputs and b the number of audio outputs. A synthesizer will normally have no audio inputs (MIDI only) and two output channels (stereo Left/Right). You also have to check the boxes for “Is a Synth” and “Plugin wants midi input” to ensure that your synth plugin(s) will be correctly recognized and set up by whatever DAW or plugin-host program you use.
The  button allows you to change the settings for the “exporter” you select using the combo box at the top. Here is the Exporter Settings view for Visual Studio 2017:
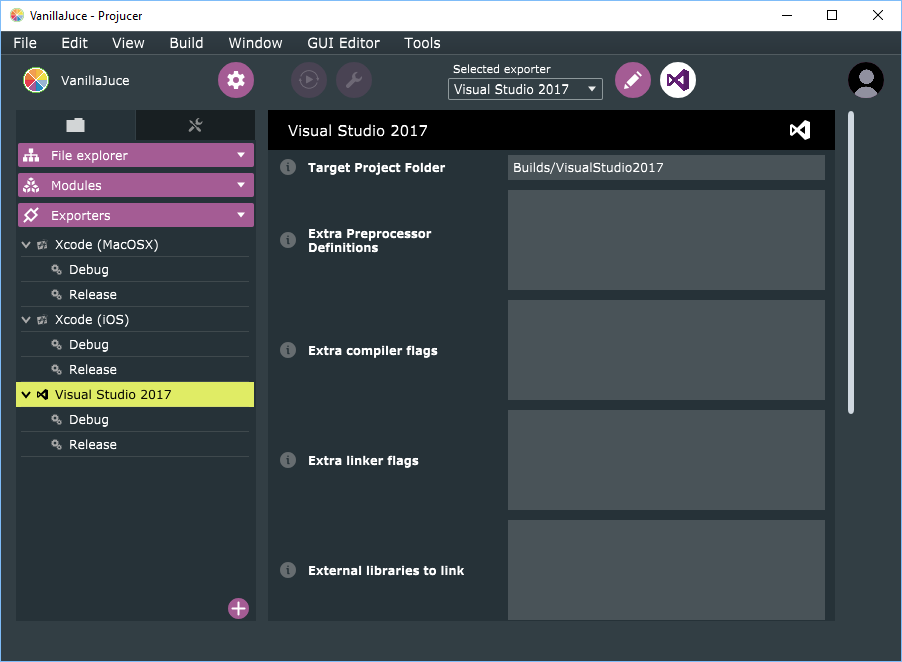
Note that whenever the exporter settings view is shown, the stacking list on the left changes so the Exporters panel is opened and the other (Modules, File Explorer) are closed. You can also click on the “Debug” and “Release” items in the Exporters panel, to select settings specific to Debug and Release builds. I haven't found the Visual Studio 2017 exporter settings to be all that useful, to be honest. The one option I'd really like to see—the ability to say you want both 32- and 64-bit build targets—is not provided.
The important thing about the exporter settings is if you make any changes, your project/solution files will get completely rebuilt, phasering any changes you might have made in your IDE. This leads to the most important thing to understand about the Projucer—two closely-related things, actually:
- You need to give the Projucer enough information to rebuild your project/solution files without losing anything important, and
- This includes your list of source-code files!
This takes us to the “File explorer” and “Modules” panels in the left part of the Projucer window. Let's start with the “File explorer”, because it's the simplest. In the File explorer panel, you can use the pink “+” button at the bottom right to add “groups” and individual source-code files, to define the groups and files you want to see in your IDE projects. Most of the time, you will add new source-files and groups in your IDE, as you develop your plugin code, and that's OK, because if you ever need to re-open your .jucer file and make a change which would cause the IDE projects to get re-generated, you can simply right-click on a group in the File explorer panel and choose “Add existing files…” to add in the appropriate links. If you forget to do this, your IDE project(s) will no longer contain the files you added previously in the IDE. Irritating, but no problem; you can always open the Projucer again and fix it. Remember: to trigger re-generation of your IDE files, choose “Save Project” from the Projucer's File menu.
For Audio Plugin projects, the Projucer won't re-generate your actual source-code files—at least not the ones in the Source folder—so you can edit these however you choose. Note this is not always the case for other project types.
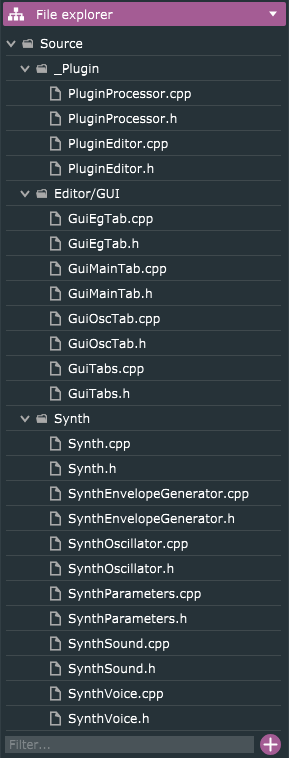
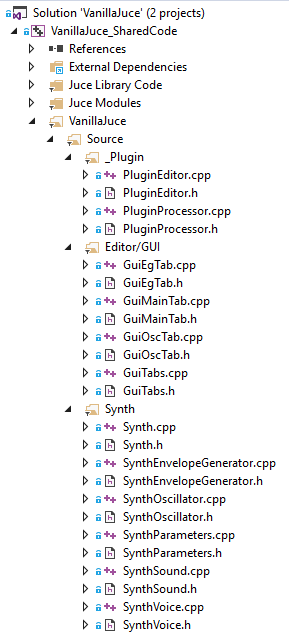
Here is a screenshot of the Projucer File explorer tab for the finished VanillaJuce project, side-by-side with the Visual Studio solution explorer for the VanillaJuce.sln solution:
The JUCE library includes a large number of modules (each of which consists of many source files) for major kinds of functionality, and the Modules panel allows you to set which of them are included in your IDE projects, and to change their default option-settings should you choose. By default, the Projucer stuffs this with a fairly large set of JUCE modules, including a few (e.g. juce_video) which a typical synthesizer plugin would never need. You can experiment with removing these individually—if you see others turn red, you'll know you've removed a module that these others depend upon—but it isn't important to do so, because your IDE's linker will ensure than only necessary JUCE code gets compiled into your final plugin.
Normally, you can ignore the Modules panel in the Projucer unless you need to add a module that isn't in the default list—say, the new DSP module in JUCE 5.1. However, if you intend to publish your code as open-source, as I have, you'll need the Modules folder for one more important step: copying the JUCE modules you use into your source-code tree. To do this, open the Projucer's Modules panel and click on the little  button at the bottom-left corner (beside the
  button) to open the Module Settings view, which looks like this:
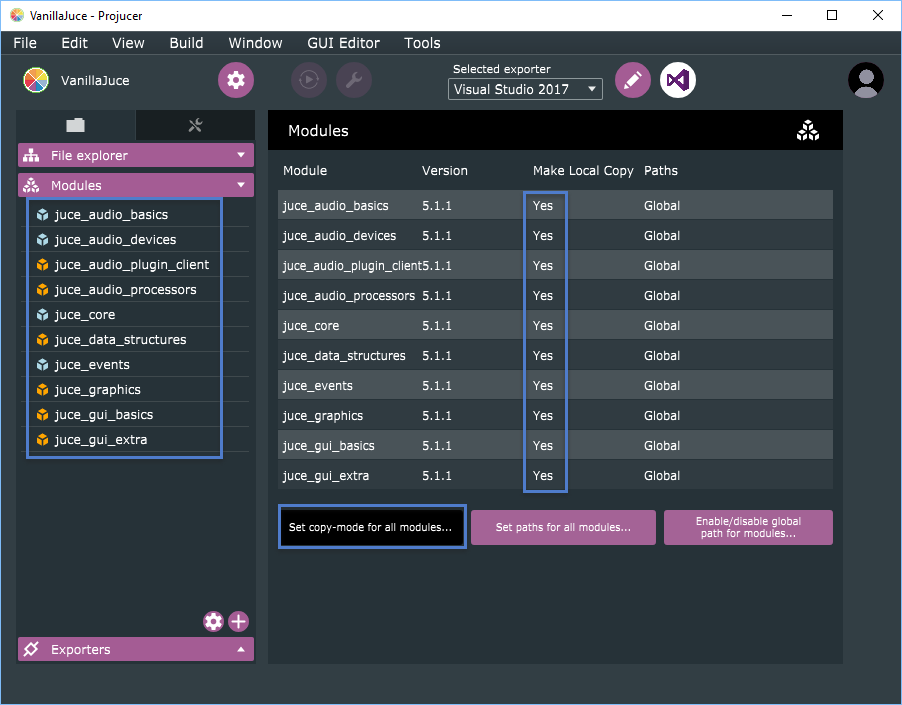
Click on the black button labeled “Set copy-mode for all modules…” and choose “Set all modules to copy locally” from the resulting pop-up menu; all entries in the “Make Local Copy” column will change to “Yes”. When you close your Projucer project, not only will the various IDE project/solution files get rebuilt as usual, a new subfolder called modules will be added to your project's JuceLibraryCode folder, containing all of the JUCE module source files your project requires.
If you're using GitHub, your next commit will take some time, as git absorbs all of the many newly-added JUCE source files. The result will be worth it, though, because it will make your GitHub repository entirely self-contained. When Roli eventually releases the next version of the JUCE library, which quite probably includes code-breaking changes, your published code will continue to use the older versions which have been checked-in along with your own code, and hence won't break.
Other things you can do with the Projucer
The Projucer is an evolving software product. It has many other features and capabilities I haven't touched on here, and I encourage you to explore them at your own pace. It includes a “live build” capability, whereby it can work essentially as an IDE, complete with a syntax-coloring source-file editor, but I confess I haven't found this very useful. I'm more comfortable working in Visual Studio or Xcode. The live-build capability seems to be something of an experimental new feature, related to the Projucer's built-in GUI Editor.
The Projucer's GUI editing features also appear to be somewhat experimental, and so far, seem mostly useful for creating stand-alone GUI applications. The basic idea is that, in the File explorer tab, you can right-click and choose “Add New GUI Component…” and specify a new class name, and the Projucer will create a .h/.cpp file pair for a new class derived from JUCE's Component class. When you click on the .cpp file in the File explorer, the right window will not only show the C++ code, it will also allow you (with tabs along the top of the edit view) to see and edit a graphical view of the GUI layout. This can even work together with the Projucer's live-build capability, to allow you to open and interact with a live version of whatever kind of GUI view you're defining.
This is all very exciting and high-tech, but to be honest, I don't like working this way. It requires that your source-code files be peppered with special comments, which guide the Projucer's GUI Editor in parsing it, and your own additions must be carefully confined to specific regions designated by these comment-tags. I find the Projucer's GUI editing features more useful simply as a tool to generate known-good JUCE GUI code.
The way I use the Projucer for GUIs is to create a new GUI Application project, use the GUI editing features to lay out a basic GUI incorporating all the elements I'm interested in (buttons, sliders, etc.), then generate the project and look inside the generated .h/.cpp files for code I can cut-and-paste into the GUI parts of, say, a synthesizer plugin project (working in my trusty IDE). In this respect, the Projucer is simply a dynamite adjunct to the JUCE API documentation, which is pretty complete but doesn't include any working examples. What's great about the Projucer is that it always generates working code. This is how I developed the tabbed GUI used in the VanillaJuce synthesizer plugin.
